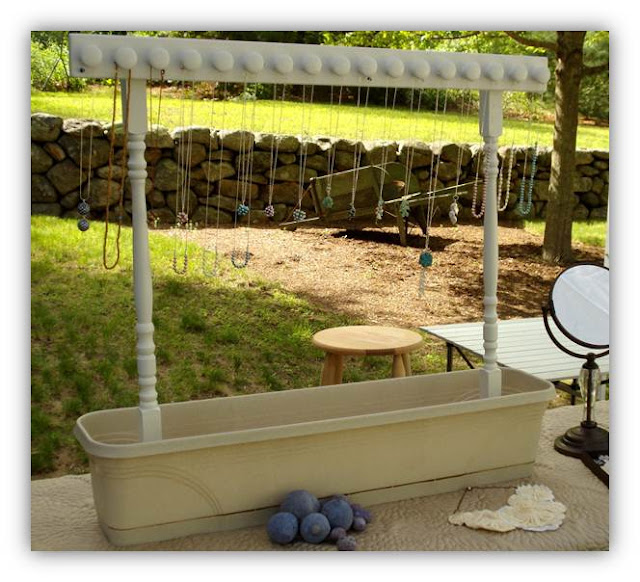
Ever since I posted my craft fair preview and the results of my first craft fair I've gotten requests for a tutorial of how I made this:
Materials
(1) 36" Window Box
(1) 32" Stair Banisters
(1) 34" long 1x2 lumber
(4) 2" x 1" angle brackets
(4) small machine screws and nuts
(6) 1/4" x 1 3/4" Thumb screws
(4) 1/4" tee nuts
(2) 1/4" wing nuts
(17) 1" diameter drawer knobs
Paint
Tools
Drill with 1/4" drill bit and 3/16" drill bit
Screwdriver (to match machine screws)
Sand Paper
Paint Brush
Level and clamps
Hammer
Tip: if you don't know your way around the hardware store, don't be afraid to hand the list to someone working there. I've done this numerous times and they'll help you find all the little hardware pieces very quickly.
Step One:
This DIY necklace display can be very flexible as far as changing size. The first step is to cut the wood to size. I used the 32" high banisters without adjusting. If you'd like your display lower just cut some off the top and bottom. Also, the lumber store can cut down your 1x2 for you, or cut it at home to 34". After all cuts are made sand all three pieces.
Step Two:
Attach all of your drawer knobs. I found this to be the most expensive item on my material list at $1 each. You can use small hooks you can find in the hardware section if you'd like to save costs here. My first knob is 1" from end of 1x2 to center. The rest are evenly spaced 2" center to center. Drill holes at all knob centers with 1/4" drill bit and attached knobs tightly.
Step Three:
Prep banisters. Line up angle brackets with bottom of banister. The angle brackets may or may not have a center hole already. Be prepared to drill through angle bracket, wood, and then angle bracket directly in the center of the bracket for the bottom attachment.
Step Four:
Line up the banisters in the window box approximately 2" from each side. Take note of the width (banisters should be about 28" apart) and lay the banisters on top of the 1"x2" board. Be sure that the banisters are parallel to each other and perpendicular to the 1"x2" board with the level and clamp them into place. Drill two 1/4" holes in each banister, evenly spaced and centered, and into the 1"x2" board far enough to seat the tee nuts. Insert the tee nuts into the 1"x2" board. You may need the hammer to seat them properly.
Step Five:
Attach the banisters to the angle brackets with the thumb screws and wingnuts. Attach the 1"x2" board to the banisters with two more thumb screws in each. Stand the display in the window box and drill through the angle brackets if needed and through the bottom of the window box. Attach the angle brackets to the window box with the small machine screws and nuts. You may find it helpful to mark which banister matches which angle brackets, just in case the holes are not lined up exactly.
Step Six:
Take the display apart again and paint everything! After the paint is dry your done! And because of the way we built it, it can be broken down for storage. At the craft fair, place a few bricks or weights in the window box to keep it from tipping over and cover it with fabric or flowers.
I hope you enjoyed this DIY tutorial. If this might be a good post for your own blog I'd be very welcome to guest blogging and sharing it with as many people as possible.
Contact me with any questions! missmeghanelizabeth@gmail.com


Awesome! I was wondering how you made this. I'm thinking about adding a second table to my tent at shows, and this would be perfect.
ReplyDeleteHello! The photos are all set. My other bridesmaid lost her jewelry (argh!) but I am more than willing to pay you for them, as I did not get photos of them!!!!
ReplyDelete